Monday, February 25, 2013

Stash buster project

For years, I have been wanting to make purses.  I must have at least 8 purse or tote patterns in my pattern boxes, purchased over a long period.  Each one had features I liked, but something got in the way of my making one of them up... either it needed a zipper, which I have always had trouble with, or it was the wrong size, or the wrong shape... as a result, I never got around to making any of them!  But recently, I followed a tutorial on making a tote for my laptop, and decided to see if I could make something similar to use as a purse.   I pulled one of my patterns out and discovered it had a simple design at its core, so I started there.  The finished  size was larger than I wanted, so I took a tuck in the middle before cutting.  And I decided to do a simple flip and stitch directly onto some warm and natural batting, then figured I would line it and add some pockets inside.
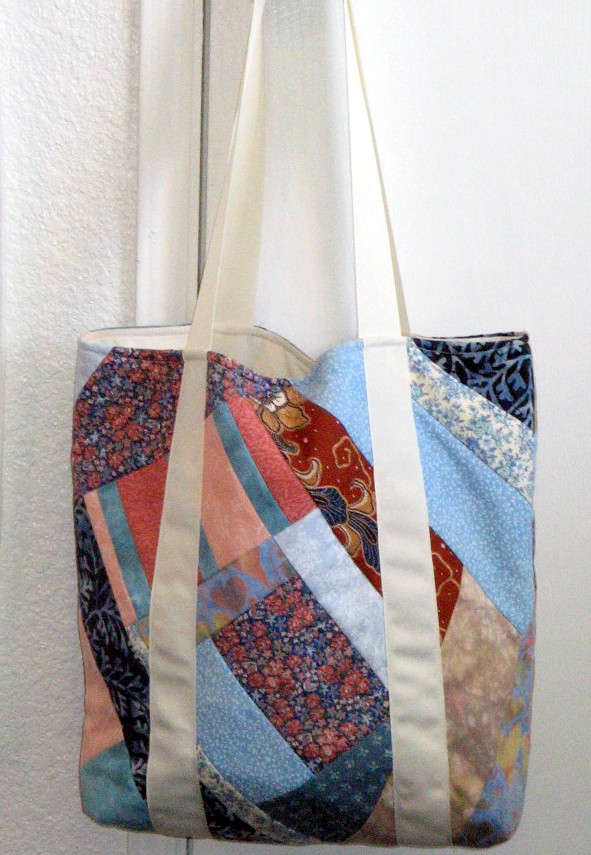
The pattern called for making straps that would encircle the bag on both sides, but I realized I had some grosgrain ribbon that would do the trick, so that saved some time and effort.  I ended up taking tucks on the top of each strap to shorten them, and that added a little stability to the straps where they rest on my shoulder.  

Here is the bag loaded with my stuff. 

I made 3 pockets - one is split in half and is just big enough for my keys and a few other small items.  
On the other side of the inside are two pockets - one is split in half, and carries my cell phone and lipstick.  Then over that and slightly below, I made a pocket large enough for my check book.  Then the bulk of my stuff is in the main part of the bag.
What I loved about making this purse is that it helped me to finally get past the block I have had for so long!  And I learned how much I really do know about constructing purses and pockets.  I plan to test this design for awhile and make sure it works well, then hope to make several over the next few months for the craft shows I will be selling at this year.  I have plans as well to test a messenger bag, although I don't think I will use flip and stitch for that style.  
Lesson learned - it's time to stop letting bad experiences from my younger days of learning how to sew get in the way of doing what I want to do!  Maybe it's time to try zippers again!


Monday, February 18, 2013

Tribute

As I mentioned in my last post, I have been posting about scrunch dyeing techniques at "... And then we set it on Fire", which is a group of fiber artists who specialize in surface design techniques.  After dyeing several pieces of fabric, I challenged myself to use some of it in an art quilt.  I played around with various methods of using the fabric combined with some of my other fabrics (stash buster!), and put the finishing touches on the piece just this morning.  Here's how it ended up:


I hung it on a cafe rod in my bathroom, next to a sunny window to highlight the quilting.  As I mentioned in my post on the other blog, I got some smudges on the center panel when I mistakenly used a graphite pencil instead of a lead pencil to trace the leaf and vine design I later embroidered.  So I decided to finish the piece, then launder it to remove the graphite.  I remembered how I love the three-dimensional quality quilts get when they have been laundered, which in this case, added to the visual interest. Then I went back in with a lead pencil, drew the vine and leaves, and embroidered... just right!  


 In the closeup above, I had a piece of fabric I dyed by covering a button with the fabric and tying with string.  The button had a raised daisy pattern which transferred to the fabric, but it was very faint.  So I embroidered the petals, then used french knots to create the center.  I free-motion quilted the white area around the flower.
This is a closeup of a square I made using some of the scrunched fabrics I dyed for the blog posts.  I used free-motion quilting to highlight the design.


Here I tried to get a closeup of the border, which was created with more of the scrunched fabrics. Again, I used free-motion quilting to meander over the patterns of the scrunch.  And this gives a little better view of the embroidered panel in the center.
I mentioned in the other blog post that I decided to call this piece "Tribute", as a tribute to my Mom, Step-Mother, Grandmothers and Great Grandma, all who were very gifted in various fiber arts, and who inspired me to work in fiber.  But it is also a tribute to the many wonderful fiber artists I have met in the past several years online, who have so generously shared their techniques with the world!  I have learned a great deal from you all, and hope to be able to share what I have learned with many more!

Saturday, February 9, 2013

Up to my ears in fabric!

I've been a busy gal lately!  I'm a Resident Artist over at "...And Then We Set it on Fire", and this month is my month to blog.  I decided to do a series of posts on Scrunch dyeing, one of my favorite methods, and I'll let you wander over there to check them out if you want.  Meanwhile, I'm now in the middle of working on ways to use some of the fabrics in a project, and my studio is in total chaos!
I took this shot yesterday as I was backing out of the room, and it only shows a small portion of the fabrics which are strewn everywhere!  And here are a couple of pieces I have created using a combination of my scrunch dyed fabrics, other hand dyed fabrics and commercial fabrics culled from my ever-growing stash:


I still don't know how this will end up, but I'm having lots of fun combining fabrics in various configurations!  Meanwhile, if you've never tried scrunch dyeing, I've given you several methods to try in my posts... hope you join in the fun!